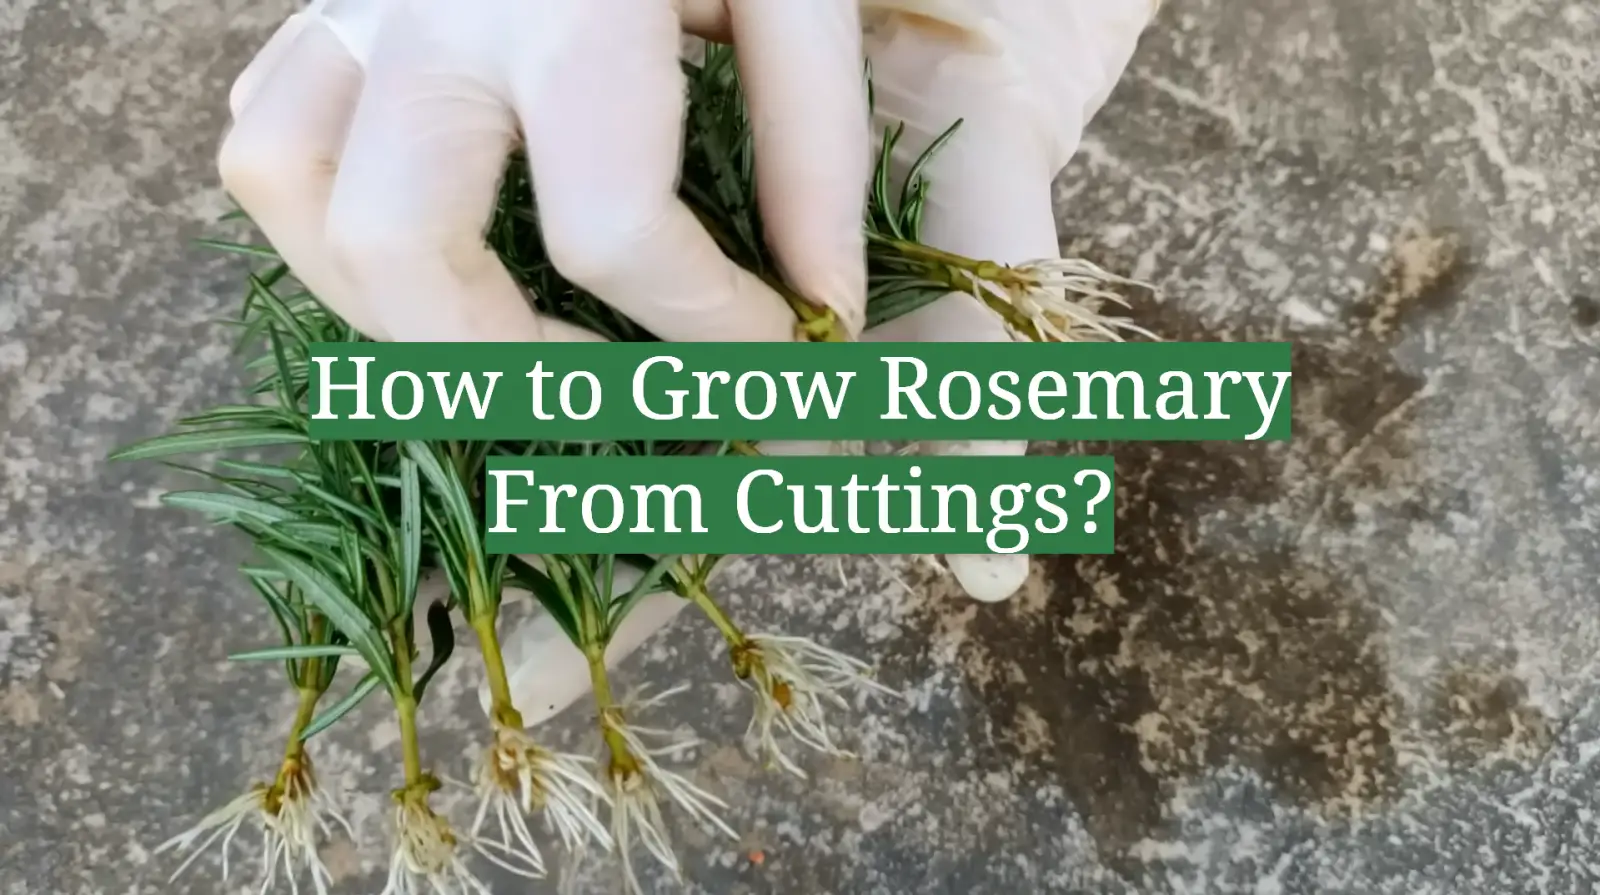
Growing your own herb garden is a great way to not only enjoy the healing and flavourful benefits of fresh herbs, but it also allows you to gain knowledge about where and how certain plants grow. Rosemary is one of those herbs that can be quite difficult to cultivate from seed, but don’t despair! Propagating rosemary through cuttings can provide a delightfully straightforward endeavor that guarantees success even for inexperienced gardeners. This blog post will provide guidance on when, where, and how to take softwood cuttings from an existing plant in order to help you propagate your fresh rosemary crops throughout the seasons.
Benefits of Growing Rosemary Plants from Stem Cuttings
Cultivating rosemary plants from stem cuttings offers numerous advantages that enhance your gardening experience in a rewarding and productive way.
- Faster Growth: Unlike seeds that need time to germinate, stem cuttings already have a matured structure which significantly speeds up the growth process. This means you’ll have a mature plant that’s ready to harvest much quicker.
- Cost-effective: Once you’ve established a mother plant, you can continue to propagate new plants without any additional costs. This can save you money in the long run, especially when compared to regularly buying herbs from a supermarket or nursery.
- High Success Rate:Cuttings obtained from plant stems generally exhibit a greater likelihood of success in comparison to seeds. Since they’re taken from mature plants, they’re more likely to successfully root and grow.
- Cloning Desired Traits: If your mother plant possesses characteristics that you want to preserve, such as size, flavor, or disease resistance, growing rosemary from cuttings ensures that these traits will be passed on to the new plants.
- Year-round Cultivation: Cuttings offer a perpetual source of fresh rosemary throughout the year, unlike seeds that have specific time requirements.
- Preserving Plant Health: By taking cuttings, you’re naturally pruning the mother plant, which can help to improve its overall health and vitality.
- Sustainability: Finally, growing your own plants from cuttings is a sustainable practice. It reduces the demand for commercially grown herbs, which often involve the use of pesticides and contribute to the loss of plant diversity.
Considerations Before Planting
Prior to starting your propagation journey, it is important to bear in mind a number of significant factors.
- Selection of the mother plant: Select a robust and nourishing rosemary plant from which to acquire your cuttings. This plant should be free from diseases and pests.
- Timing: While you can take cuttings at any time of the year, the best time is in late spring or early summer when the plant is growing actively.
- Choosing the right stem: Choose a stem that is at least 3 inches long and has new growth. The stem should be firm, but not woody.
- Rooting medium: Use a light, well-draining potting mix for best results. A combination of peat moss and perlite works well.
- Watering: Don’t overwater your cuttings as this can lead to root rot. Keep the soil moist but not waterlogged.
- Location: Place your cuttings in a location that receives bright, indirect light. Avoid direct sunlight as it can dry out the cuttings.
- Patience: Remember that propagation from cuttings can take time. Be patient and wait for the roots to develop fully before planting your cuttings out.
Step-by-Step Guide to Growing Rosemary from Cuttings
In this section, we will explore an in-depth, tutorial on propagating rosemary through cuttings. This process, while requiring some patience, is relatively straightforward and rewarding.
Select Healthy Parent Plant
The first step in successful propagation is selecting a healthy parent plant. When choosing the plant, there are a number of factors to consider:
- Look for vigorous growth: A good parent plant should be robust and vigorous, with new growth evident. This indicates that the plant is in good health and has the energy to produce successful cuttings.
- Inspect for signs of disease or pests: It’s crucial to choose a plant that’s free from any diseases or pests. Check the leaves, stems, and roots for any signs of damage or unusual markings. Common signs of disease include discolored leaves, wilting, and slow growth.
- Check the age of the plant: Choose a mature plant, but not too old. Mature plants (at least one year old) are more likely to produce successful cuttings than young plants, as their more mature tissues contain more stored energy.
- Consider the plant’s history: If possible, choose a plant with a history of vigorous growth and disease resistance. This means the plant’s genetics are likely to be strong, which will increase the chances of successful propagation.
Once you’ve selected your parent plant, it’s time to prepare for the cutting process. Ensure you have all the necessary tools and materials at hand, such as a sharp, sterilized knife or scissors to take the cuttings, and a light, well-draining potting mix to plant them in.
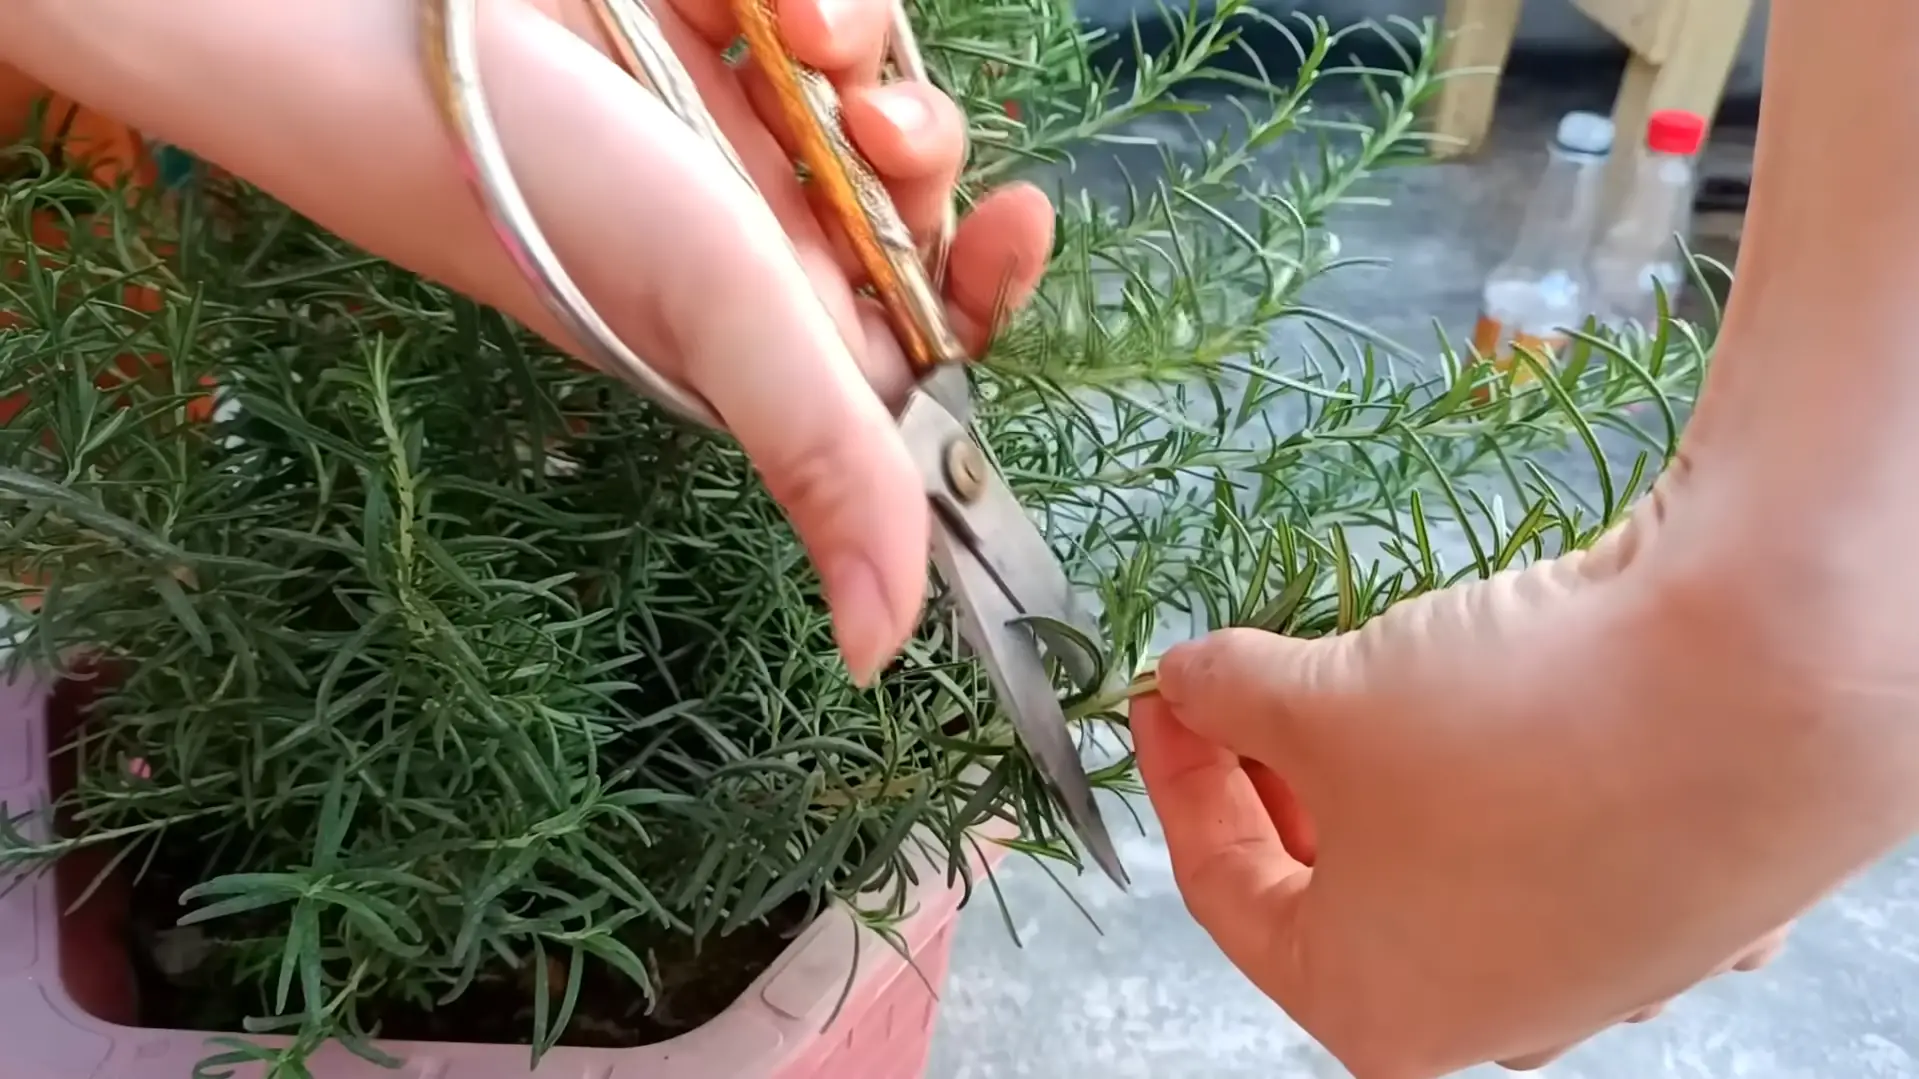
Prepare Cuttings
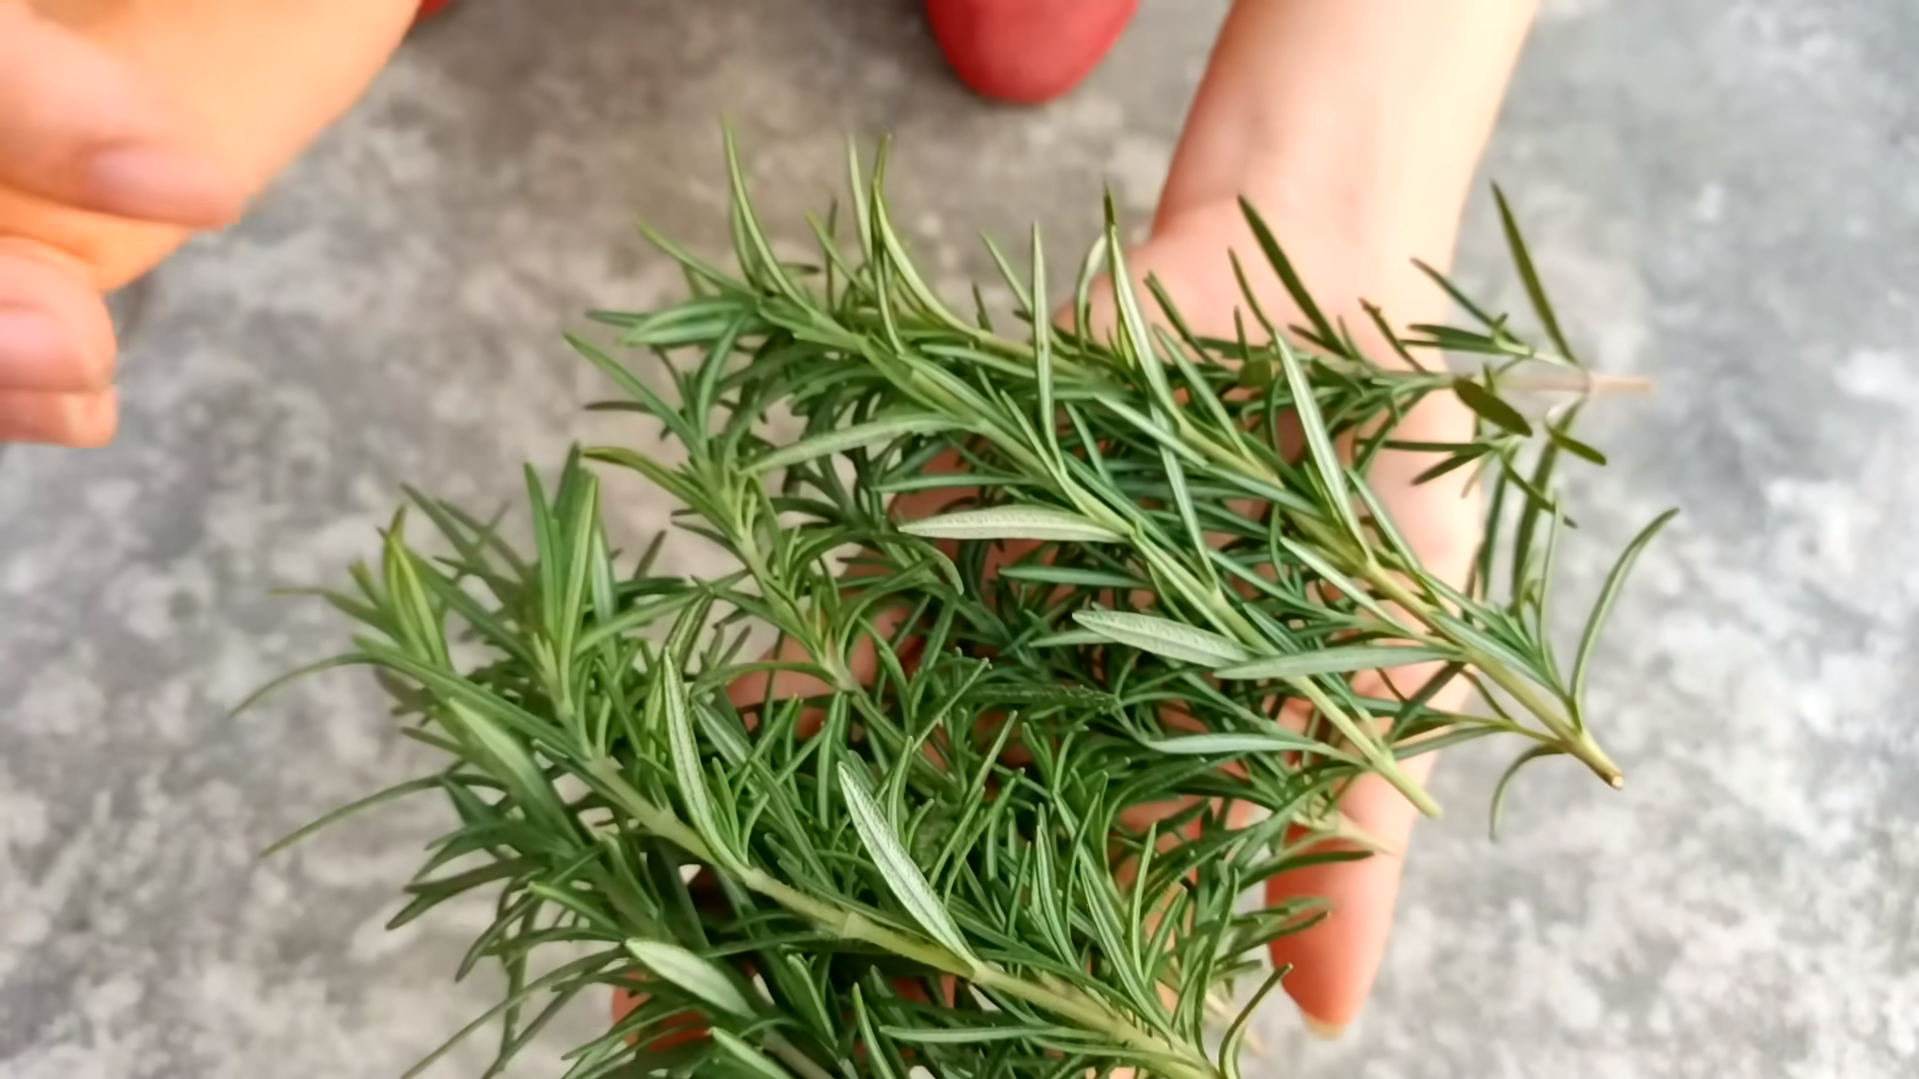
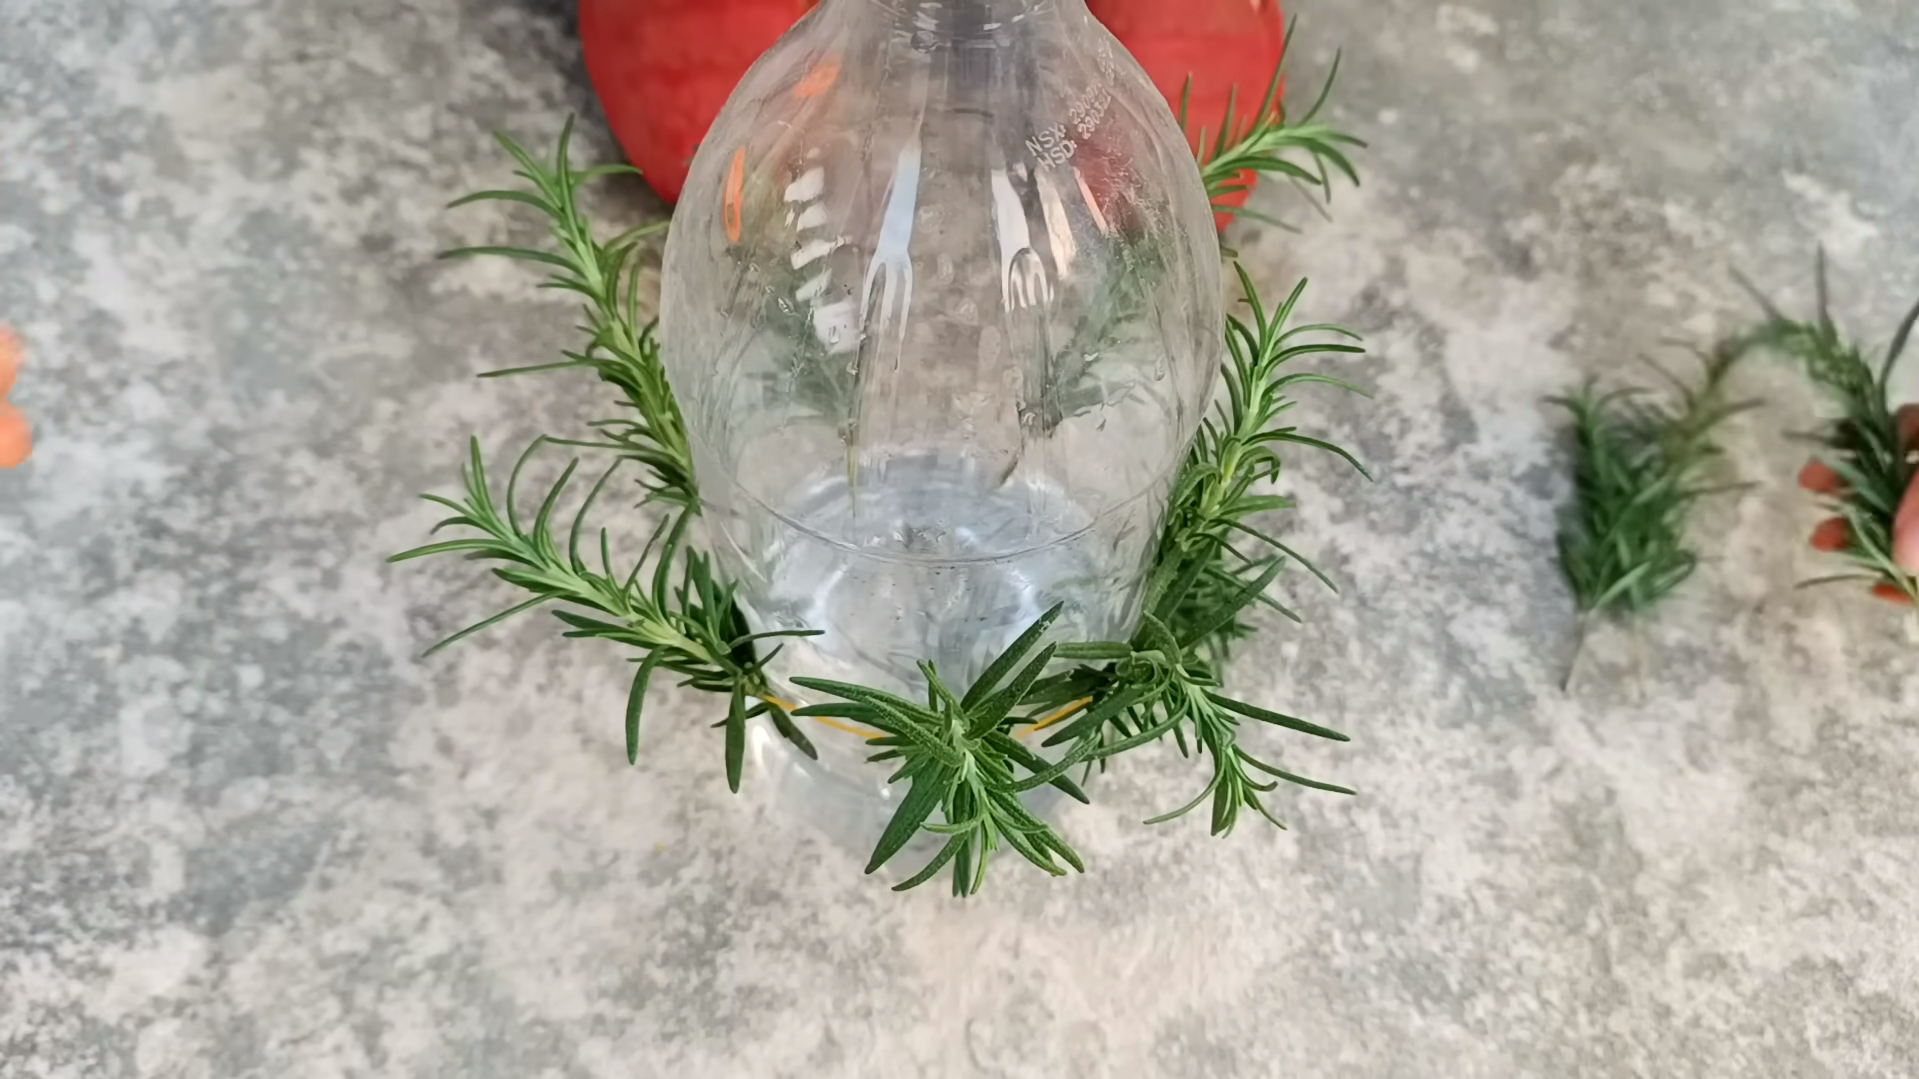
Preparing cuttings is a delicate process that demands precision and care. Begin by choosing a robust and disease-free shoot from the original plant. Aim to choose a stem that is neither too young nor too mature, preferably one that has recently finished blooming.
With a sterilized knife or scissors, carefully trim a stem that is about 4 to 6 inches long. [1] To induce the development of new roots, make the cut just beneath a leaf node (the point of leaf growth). Prevent moisture loss and potential rot by eliminating the leaves from the bottom half of the cutting.
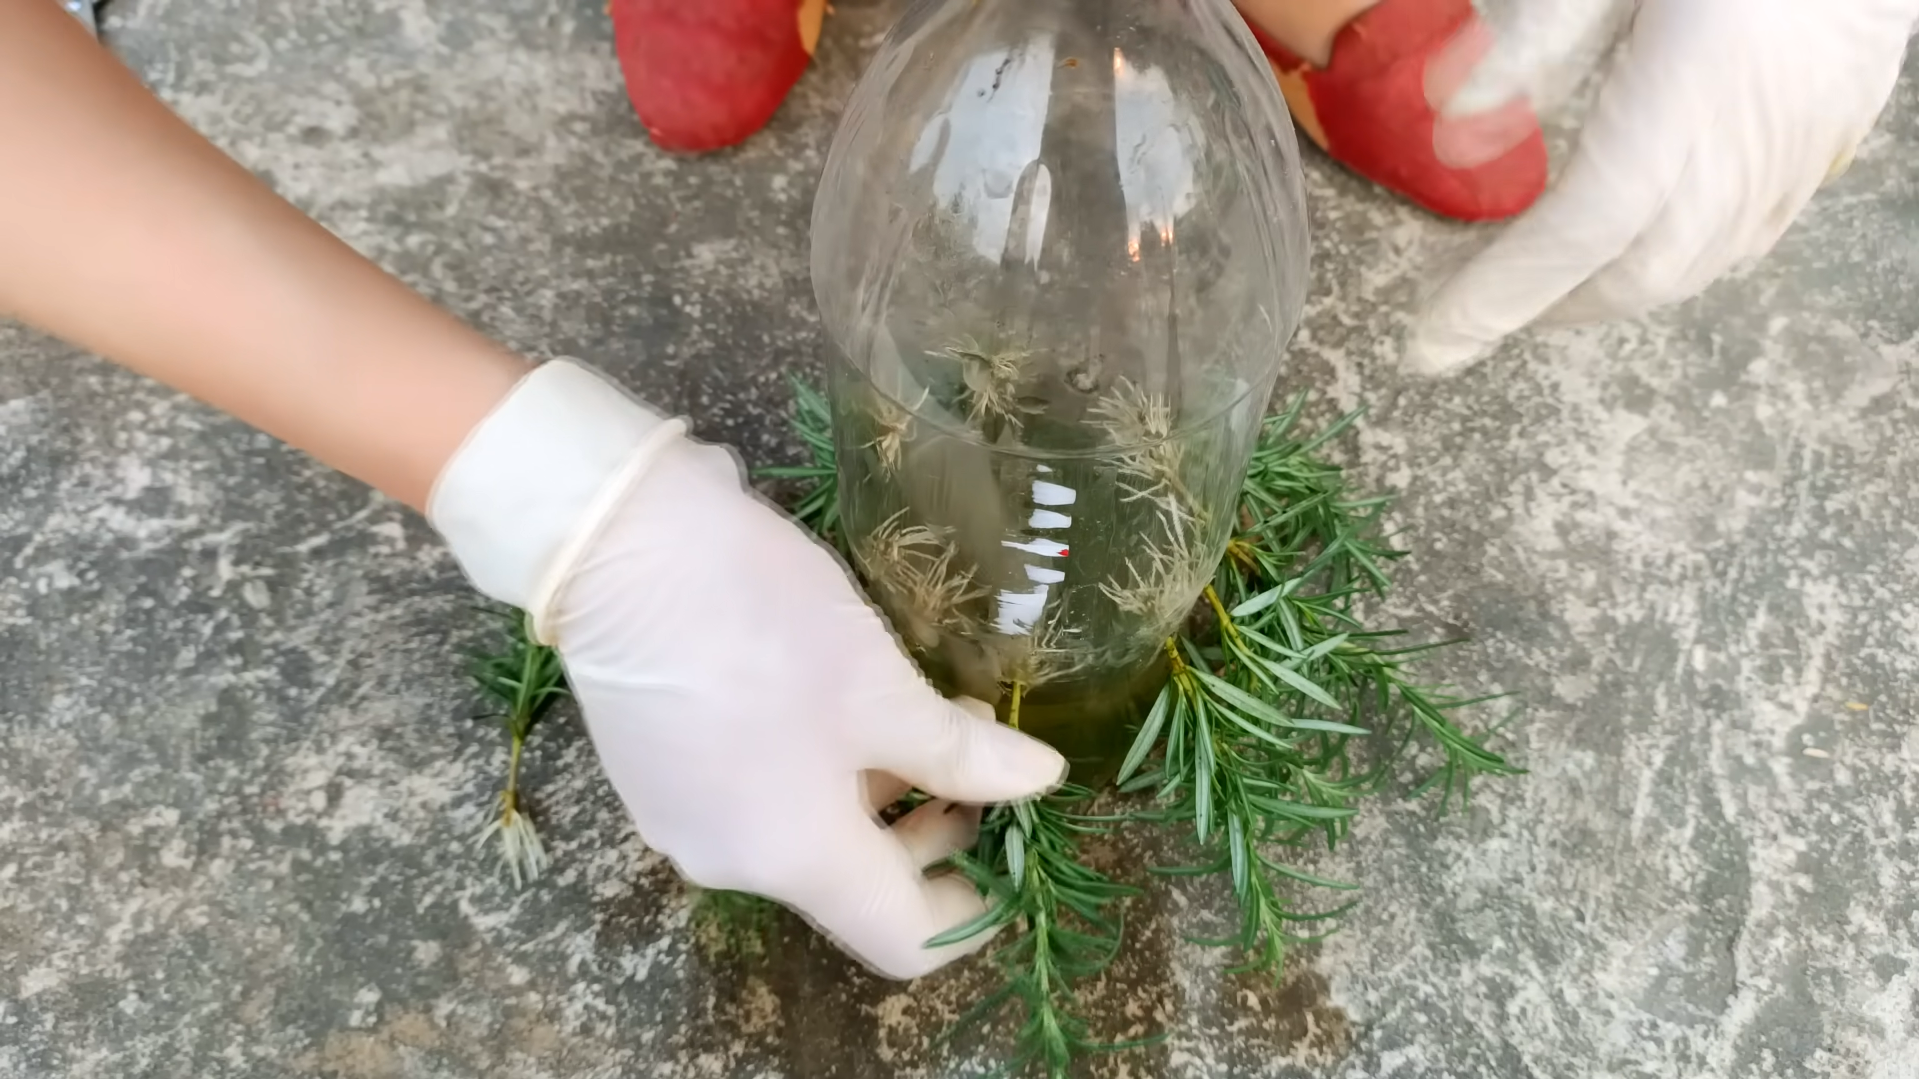
Once you have your cutting, it’s crucial to act quickly to prevent it from drying out. If you’re not able to plant immediately, place the cut end in water temporarily. Before planting, you can enhance the likelihood of successful rooting by dipping the cut end of the stem in rooting hormone. Although this step is not mandatory, it can significantly boost the chances of successful rooting.
To ensure optimal humidity levels, water the cutting and cover the pot with a plastic bag to create a small greenhouse. Place the cutting in a warm location with indirect sunlight. Remember to monitor the moisture content daily and lightly spray with water as needed to prevent the soil from drying out.
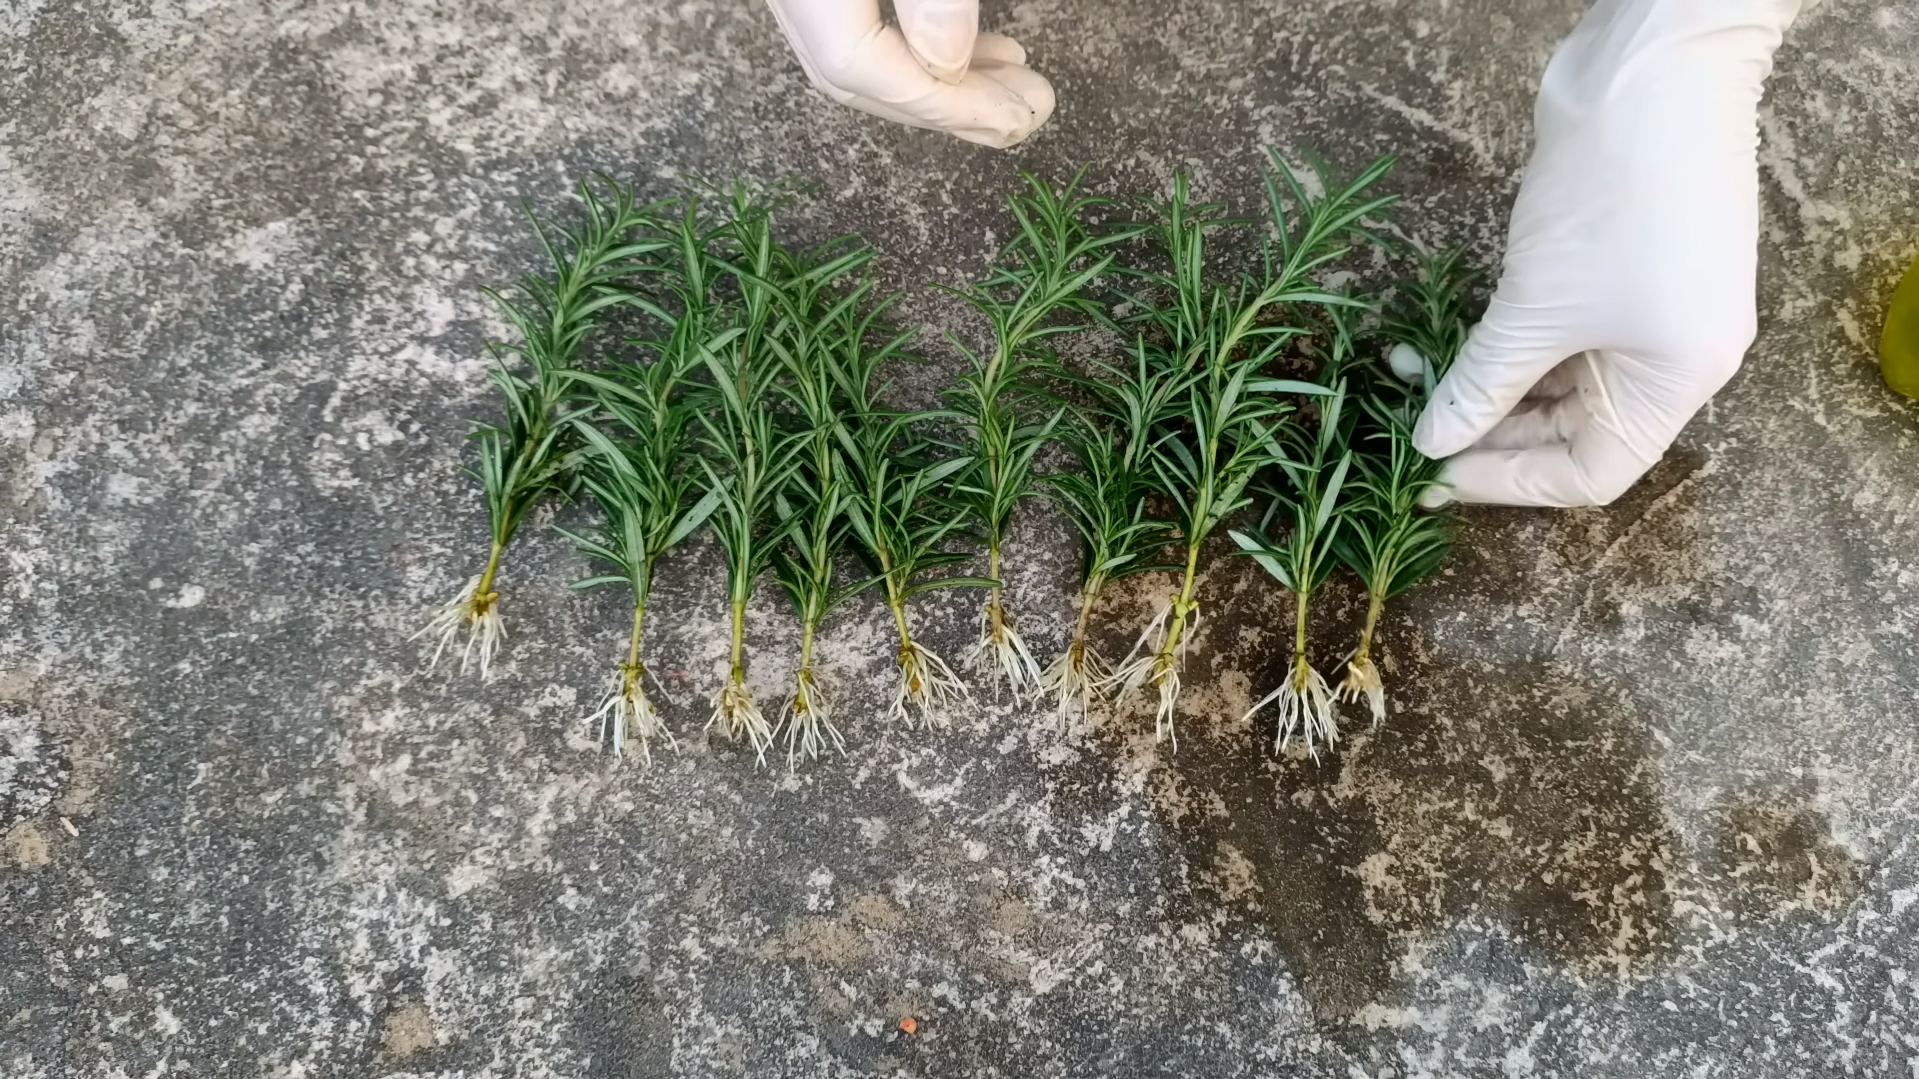
Rooting can be a time-consuming process that may span several weeks. It’s important to exercise patience and refrain from pulling on the cutting. The emergence of new growth is a positive indication that your cutting has root successfully and is progressing towards becoming a new plant. It’s essential to keep in mind that propagation demands dedication, patience, and a whole-hearted commitment.
Optional: Apply Rooting Hormone
Using rooting hormone is quite simple. First, you will need to purchase a hormone powder or liquid from a store or online. Pour a small amount of the hormone into a separate container to avoid contaminating the original bottle. Immerse the trimmed end of your plant cutting in the hormone, making sure that the area where you took off the leaves is thoroughly coated. About an inch of coverage is ideal. Remove any excess hormone by shaking it off, as using too much can hinder the rooting process. Your cutting is now prepared for planting. Keep in mind that although using a rooting hormone can increase the likelihood of successful propagation, it is not obligatory, as many cuttings can root successfully without it.
Plant Cuttings
After your cuttings are ready, you can proceed to planting. Prepare a pot by filling it halfway with a combination of perlite and peat moss. This will provide proper drainage and maintain a sterile environment for your cuttings. Use a pencil or any similar object to create a hole in the potting mixture for placing the cutting. Ensure that any nodes where leaves were removed are positioned below the soil line. Finally, gently press the soil around the cutting to provide support.
Water the recently planted cuttings until water drains out from the pot’s drainage holes. If possible, cover the pot with a plastic bag or dome to create a mini greenhouse atmosphere. It will maintain the right humidity levels for optimal growth. Put the pot in an area that gets ample indirect sunlight and maintain the soil’s moisture level without overwatering. With patience and proper attention, you’ll witness new growth in a few weeks, signifying successful root growth.
Mist and Cover
After the cuttings are planted, it’s crucial to maintain the correct humidity and temperature. Mist the cuttings daily with water to ensure they do not dry out. In the early phases, it is crucial to provide an optimal environment for root development. Retaining moisture by using a cover or plastic bag creates a greenhouse-like effect, which proves exceptionally beneficial.
Ensure regular inspection for signs of mold or disease and promptly remove any affected cuttings to prevent the spread of infection. Keep in mind that achieving successful propagation calls for patience. It may take several weeks to months for certain plants to establish a robust root system.
Provide Indirect Light
To provide indirect light, place your cuttings near a bright window, but not directly in the sunlight, as this could scorch the young plants. Instead, an alternative method is to utilize a grow light, strategically positioning it to provide illumination to the plant without directly shining upon it.You can also use a light diffuser or sheer curtains to soften the light if it’s too intense.
Indirect light is essential in the propagation process because it prevents the delicate cuttings from getting burnt by the harsh direct sunlight. At the same time, it provides the necessary light energy for photosynthesis. Photosynthesis is crucial for the developing plant as it uses light to convert water and carbon dioxide into oxygen and glucose, which aids growth. Care must be taken to strike a balance between too much and too little light, as both can adversely affect the plant’s growth.
Monitor and Water
Monitoring and watering are critical steps in the propagation process. An essential part of plant care is maintaining a proper watering schedule. Overwatering or underwatering can harm the developing plant, so it’s necessary to maintain a balance. To ensure this, keep the soil lightly moist but not soaking wet. A handy guideline is to let the upper inch of the soil dry out before watering again.
In terms of monitoring, check your plants daily for signs of growth or any problems. You should look for new roots, leaves, or buds appearing on the cuttings. Monitoring will also help you spot any early signs of disease or stress, such as yellowing leaves, spots, or wilting. If you see any of these signs, try to diagnose the problem and correct it as soon as possible to ensure your plant’s healthy growth.
Root Development
Root development is a vital process in plant propagation. It’s the stage where the cuttings begin to establish their root system, which is essential for their nutrient uptake and stability. During this phase, it’s crucial to maintain optimal conditions to encourage root growth. This includes maintaining the right temperature, humidity, and light conditions. Keep the soil consistently moist but not soggy, and ensure the cuttings have access to indirect sunlight. Also, remember to avoid disturbing the cuttings during this critical growth phase.
As the roots start to form, you may notice changes in the cutting’s foliage, such as new leaf growth, which is a positive sign of root development. You can also carefully check for root growth by lightly tugging on the cutting. If there’s resistance, it’s a good indication that roots are forming. Once a robust root system is established, the plant cutting will be ready to be transferred to a larger pot or to the outdoors, depending on the plant type and the current season.
Transplanting
Transplanting is the process of moving a plant from one growing medium or location to another. This usually occurs once the plant has established a robust root system and is ready for a more substantial growing environment. It’s important to be careful during this process, as the plant’s roots are still fragile and can be easily damaged.
Begin the transplanting process by thoroughly watering the plant in its current pot to ease the extraction process. Prepare the new pot or garden location by ensuring it has high-quality soil and is an appropriate size for the plant’s root system. Dig a hole in the soil that is ample in size to accommodate the plant’s roots without causing any crowding or harm.
Post-transplant, the plant may experience some shock, which can manifest as wilting or leaf loss. This is normal and part of the plant’s adaptation to its new environment. Maintain regular watering and appropriate lighting conditions to support the plant during this transition period. With time and proper care, the plant will adjust to its new location and continue to thrive.
Caring for Rooted Rosemary Plants
Caring for your rooted rosemary plant requires attention and good gardening practices. Watering it adequately is critical. Unlike many other plants, rosemary prefers soil on the drier side, so ensure your plant’s pot has good drainage to prevent waterlogging. Water it thoroughly, but then let the soil dry out before watering again.
Regular pruning is also beneficial for rosemary. To promote dense growth and prevent the plant from becoming spindly, it is advisable to trim it during the beginning of spring. Additionally, pruning encourages the plant to generate fresh foliage, which aids in the production of its delightful aromatic oils.
Rosemary flourishes in bright sunlight, so choose a spot for your plant that offers a minimum of six to eight hours of direct sunlight. Yet, too much heat can dry it out. If you live in a hot climate, provide the plant with some afternoon shade. [2]
Temperature is another key factor. Rosemary is a hardy plant and can withstand cooler temperatures, but it doesn’t fare well in freezing conditions. In winter, if temperatures in your area drop below 30°F (-1°C), consider moving your plant indoors or providing it with some form of frost protection.
Feeding your rosemary plant is not usually necessary if you’re growing it in rich, well-draining soil. However, if your plant’s growth seems stunted or its leaves are discolored, you may apply a balanced, water-soluble fertilizer.
Frequently Asked Questions
How long does it take for rosemary cuttings to root?
Rosemary cuttings typically take between 2 to 3 weeks to root under optimal conditions. However, the exact time can vary based on factors such as the type of rosemary, the condition of the cutting, and the environmental conditions (temperature, humidity, light, etc.). It’s also important to keep the soil moist but not soggy, as the cuttings may rot under waterlogged conditions. Once the cuttings have developed robust roots, they can be transplanted to a larger pot or directly in your garden.
Can you grow rosemary from a cut branch?
Yes, you can propagate rosemary from a cut branch. To do this, cut a 3 to 5-inch long piece from a healthy branch of your rosemary plant. Remove the leaves from the bottom two-thirds of the cutting and then dip the cut end into a rooting hormone. Afterward, plant this cutting in a small pot filled with a mixture of perlite and peat moss. Keep the cutting in a bright, warm, and humid environment and make sure the soil remains moist but not waterlogged. Once the cutting has developed strong roots, which usually takes 2 to 3 weeks, it can be transplanted to a larger pot or the garden.
Can you root rosemary cuttings in the soil?
Absolutely, rooting rosemary cuttings in soil can be quite successful. For this, prepare a pot with well-draining soil or a mix of sand and potting soil. Make sure to water the soil thoroughly and let it drain before placing the cutting. Insert the cut end of your rosemary stem about 1 to 2 inches into the soil. It’s advisable to cover the pot with a plastic bag to create a mini greenhouse, maintaining high humidity which is ideal for rooting. Keep the pot in a warm, bright location but out of direct sunlight.
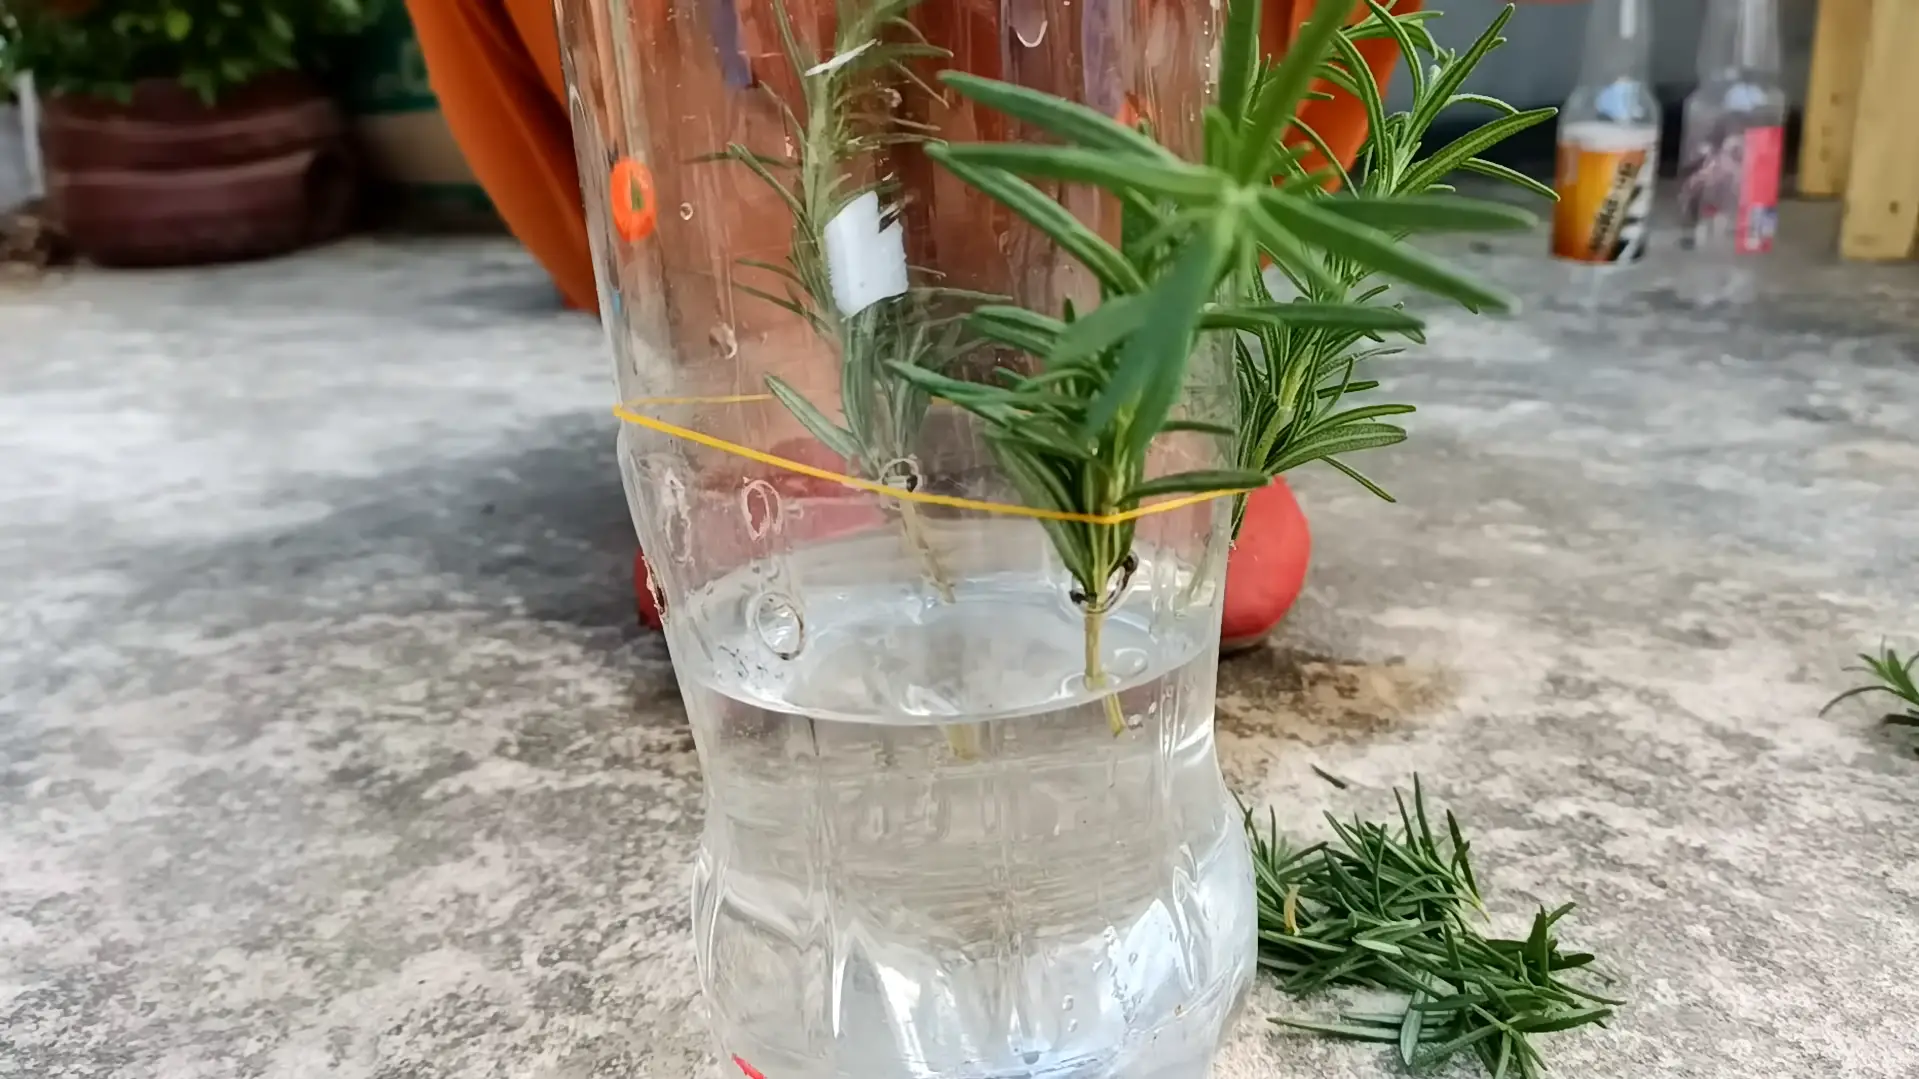
Is it better to root cuttings in water or soil?
The choice between rooting cuttings in water or soil often depends on the specific plant species and the gardener’s personal preference. Some plants may root more successfully in water, while others do better in soil. However, for many herbs like rosemary, both methods can yield good results. Rooting in water is generally simpler and allows you to visibly see when roots have formed. However, plants rooted in water might have a harder time acclimating to soil later. On the other hand, rooting directly in soil can establish stronger, soil-acclimated roots from the start, but it requires careful watering to maintain the right moisture balance. Overall, both methods can be effective, and choosing between them often comes down to what works best for you and your plants.
Useful Video: How to Grow Rosmarinus Officinalis From Cuttings Fast and Easy
Conclusion
In conclusion, rosemary plant cuttings are an excellent way to propagate many different varieties of this popular herb. All you need to do is cut a stem from an existing plant that is healthy and long enough to place into your soil, water it regularly, and watch the new growth appear over time. Roots will begin to form on the cutting before soon becoming its own established plant. It may also help you save money as compared to buying already grown plants from nurseries so why not give it a try? Growing rosemary from cuttings can seem intimidating at first, but with the right technique and efforts, you will be able to take advantage of this rewarding experience quickly.
References:
- https://gardenerspath.com/plants/herbs/propagate-rosemary/
- https://www.epicgardening.com/rosemary-sun/