One of the most important pieces of equipment for any garden is the humble garden hose. A good, sturdy garden hose can help you water your plants, clean your patio, and much more. However, like all things, hoses eventually wear out and need to be repaired. In this article, we will answer some common questions about how to repair a garden hose. We’ll provide useful tips on how to extend the life of your hose and fix it when it goes wrong. Let’s get started!
Why You Should Repair a Damaged Garden Hose as Soon as Possible
A garden hose is an essential tool for any gardener or homeowner. They are used to water plants, wash cars, and even clean gutters. But like any other type of hose, garden hoses can develop holes and leak over time.
It’s no secret that garden hoses can spring a leak. In fact, it’s one of the most common issues that homeowners face with their outdoor plumbing. While a small leak might not seem like a big deal, it can actually lead to some pretty serious problems down the road if it’s not fixed properly and in a timely manner.
But perhaps the most serious reason to fix a damaged garden hose is that it could pose a danger to your plants. Water is essential for plant life, but too much of it can actually be harmful. If water leakage from your hose is seeping into the roots of your plants, it could lead to root rot, a condition that can kill your plants.
Fortunately, repairing a garden hose is usually a pretty easy and straightforward process. In most cases, you won’t need to call in a professional or replace the entire hose. With a little bit of know-how and the right tools, you should be able to fix the problem yourself in no time. [1]
How to Repair a Garden Hose
Now that we’ve gone over some of the reasons why you should repair a garden hose as soon as possible, let’s take a look at how to do it. Depending on the severity of the damage, there are a few different methods you can try.
Locate the leak
The first step is to identify where the leak is coming from. This can be tricky, especially if the hole is small or the water is coming out in a stream. A good way to narrow down the location is to turn on the water and feel along the hose for wet spots. Once you’ve found the general area, you can use your fingers to feel for a hole or crack. If the leak is coming from a small hole, you may be able to temporarily patch it with tape or glue. If the damage is more extensive, you’ll need to replace the damaged section of the hose.
Let’s take a look at the most common types of garden hose leaks and how to find them:
- Leaks at the faucet connection – If your hose is leaking water from where it’s attached to the faucet, the first thing you’ll want to do is check the washer. In most cases, this is simply a matter of replacing a worn-out or damaged washer;
- Leaks in the middle of the hose – If your hose is leaking water in the middle, it’s probably because of a hole or cracks. As we mentioned earlier, the best way to find these leaks is to turn on the water and feel along the hose for wet spots. Once you’ve found the general area, you can use your fingers to feel for a hole or crack;
- Leaks at the end of the hose – These leaks are usually caused by cracks or holes in the coupler (the brass fitting that connects the hose to the spray nozzle, sprinkler, etc.). To repair this type of leak, you’ll need to replace the damaged coupler; [2]
Fix the leaky joints
One of the most common problems with garden hoses is leaks at the joints. These leaks are usually caused by worn-out washers. To fix them, you’ll need to replace the washers. This is a pretty easy job that anyone can do.
If you notice a small leak coming from one of the joints, simply unscrew the joint, remove the old washer, and replace it with a new one. You can find replacement washers at any hardware store. If you’re unsure of what size to get, take the old one with you to be sure. For better results, you can lube your washers with petroleum jelly. [2] [3]
Fix tears and holes
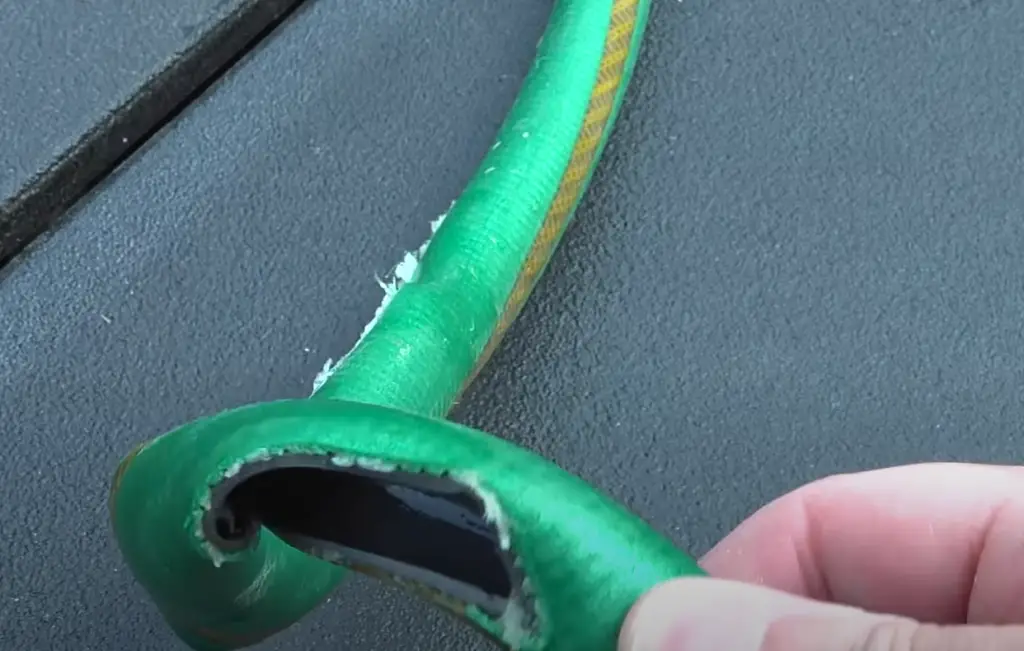
But by far the most common cause of garden hose leaks is physical damage, such as holes, cracks, or tears. These can be caused by anything from sharp objects to excessive sunlight and heat. There are various ways to repair these types of leaks, depending on the size and location of the damage.
Dry the area
One of the most important steps in repairing a garden hose is to make sure the area around the damage is dry. This will help you determine the extent of the damage and also make it easier to apply the repair. If the area is wet, you can use a cloth or towel to dry it off.
Apply rubber cement
If the damage is small, such as a tiny hole or crack, you can try using rubber cement. Rubber cement is a type of adhesive made from natural or synthetic rubber and solvents. It is often used in the construction and repair of rubber products, such as tires, hoses, and gaskets. Rubber cement is also used to bond metal, glass, and plastic.
Simply apply the cement to the area around the damage and allow it to dry. Avoid getting the cement inside the hole! Once it’s dry, the cement will create a temporary seal that will prevent further leaking.
Use a tire repair kit
If the damage is more severe, such as a large hole or tear, you may need to use a tire repair kit. Tire repair kits are designed to permanently repair holes and tears in rubber products, such as tires and hoses. They typically come with a piece of patch material and an adhesive that you can use to bond the patch to the damaged area.
To use a tire repair kit, first, clean the area around the damage with a cloth or towel. Next, cut a piece of patch material that is slightly larger than the damage. Apply the adhesive to the back of the patch, then place it over the damage. Use your fingers to smooth out any wrinkles or bubbles. Allow the adhesive to dry for several hours before using the hose again.
Since the application procedure can vary depending on the type of kit you have, it’s a good idea to read the instructions that come with your kit before starting. Apply tape
For small holes or cracks, a quick fix is to apply tape to the affected area. This is particularly effective for leaks near the end of the hose, where there is less pressure. You can use any type of tape, but duct tape and electrical tape are both good options. Simply wrap the tape around the hose, overlapping the edges of the hole or crack.
Duct tape is also a good option, but it is not as durable as electrical tape and may need to be replaced more often.
Using a hose clamp
If the damage to your hose is relatively minor, you may be able to get away with using a hose clamp. This is a temporary measure, but it can buy you some time until you’re able to replace the hose entirely.
First, locate the point at which the leak is occurring. If the leak is in the middle of the hose, you’ll need to cut out that section and replace it with a new piece.
Once you’ve found the location of the leak, clean out the area around it so that it’s free of dirt and debris.
Next, insert a new end onto the hose, making sure that it’s tight enough to create a seal. Finally, attach the hose clamp around the new end, being careful not to make it too tight or too loose. You’ll need to be able to remove it later, so don’t make it permanent.
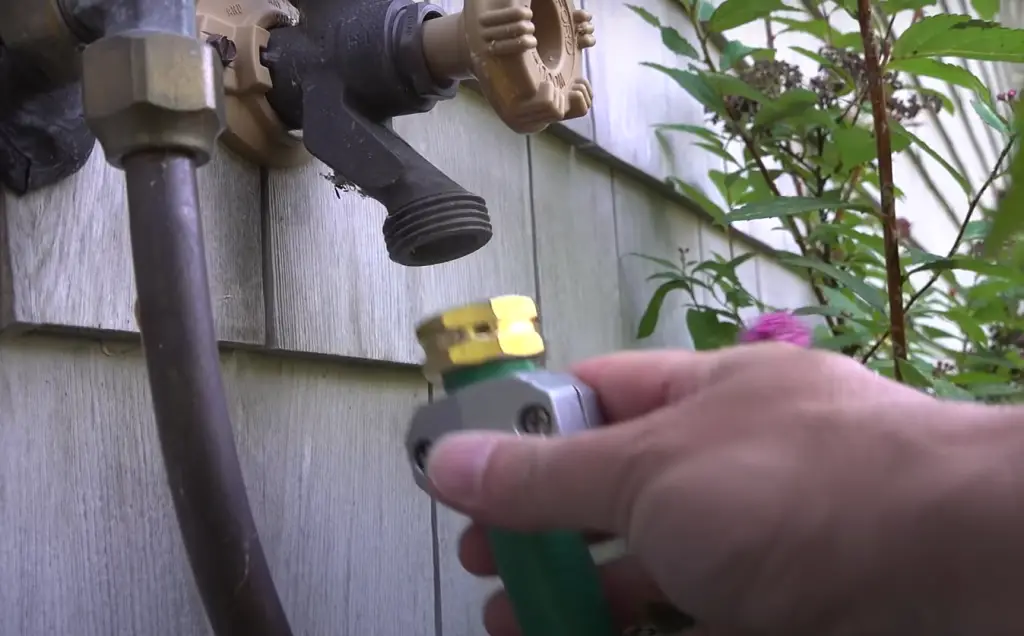
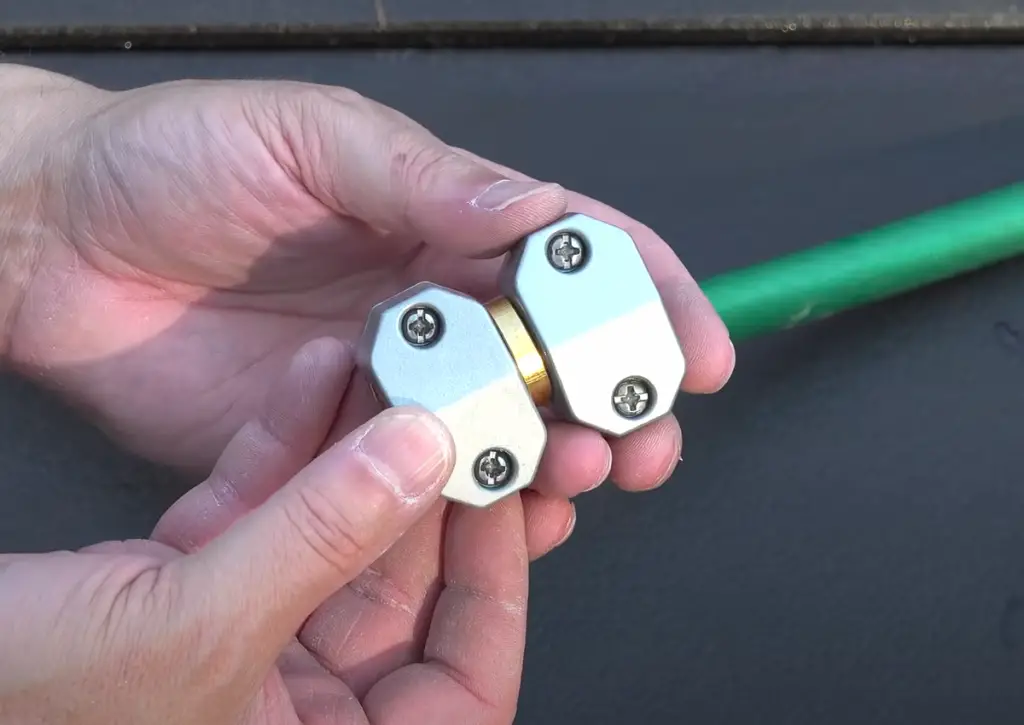
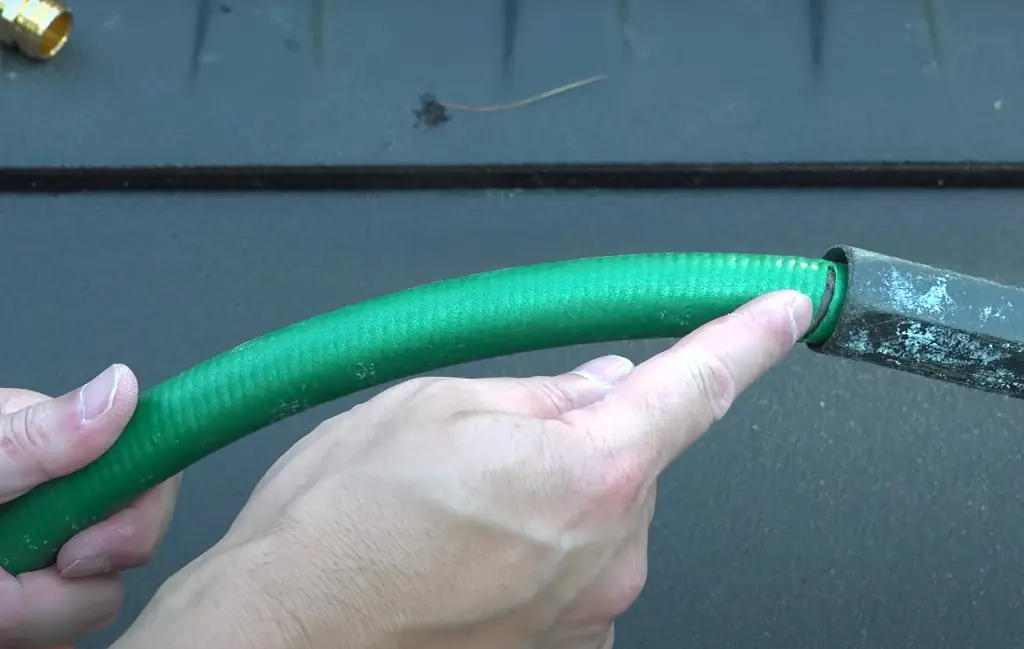
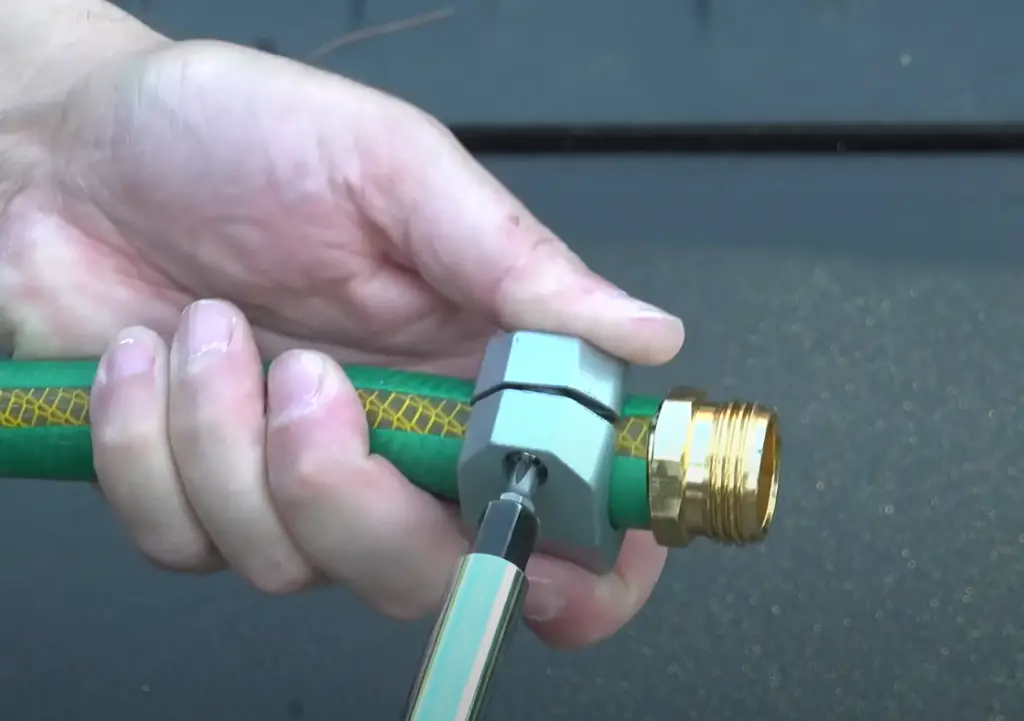
Install compression mender
Compression menders can also be used to repair small holes and cracks in garden hoses. They work by compressing the two sides of the hose together, creating a watertight seal.
To install a compression mender, start by cutting out the damaged section of the hose. Make sure the cuts are clear and straight. Then, slide the mender onto the end of the hose and screw it into place. Be sure to follow the instructions that come with the mender, as they can vary slightly depending on the brand.
Finally, slowly start running water through the hose to check for leaks. If everything is working properly, you should be good to go.
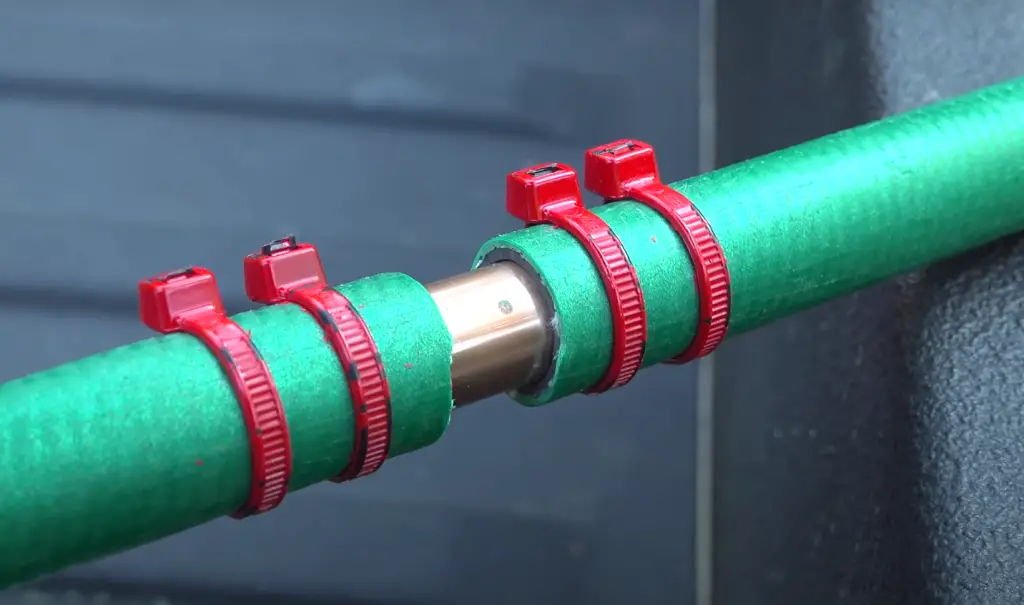
Utilize coupling for severe tears
If the damage is more severe, such as a large hole or tear, you may need to use a coupling. A coupling is a device that connects two pieces of pipe or hose together. There are various types of couplings, hose menders being one of the most common.
Hose menders are devices that are used to attach two pieces of hose together, or to repair a hole in a hose. There are many different types and sizes of hose menders available on the market, but they all serve the same purpose.
Most hose menders are made from metal or plastic, and they come in both male and female versions. Male hose menders have a threaded end that screws into the female fitting on the end of the hose, while female hose menders have a smooth inner surface that the male fitting on the end of the hose slides into.
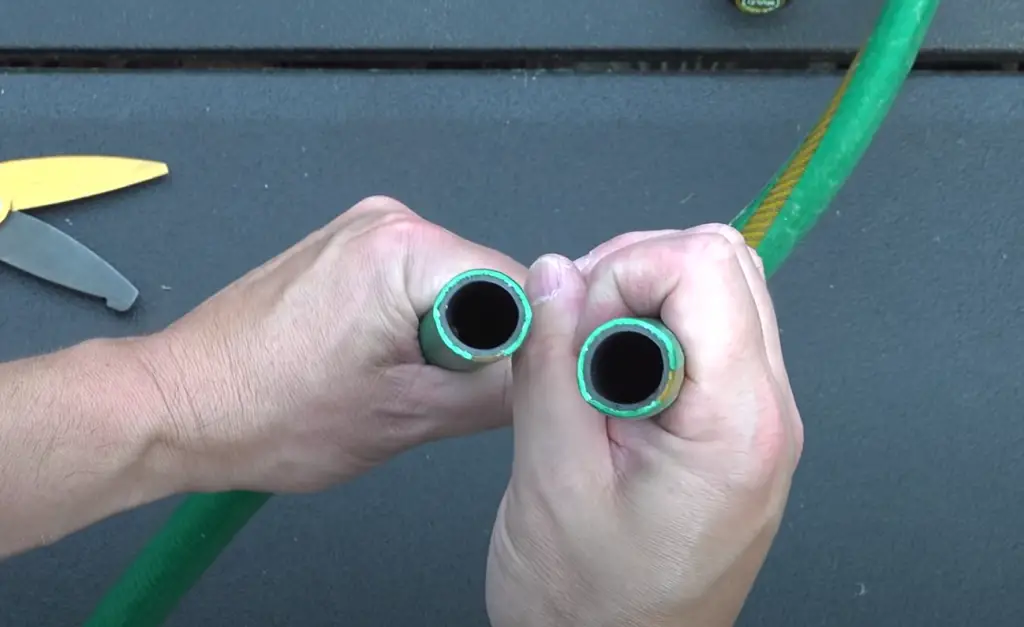
To repair a garden hose with a coupling, first, identify the location of the damage and cut out the damaged section. Then, run all the water out of the hose so that it is completely empty. Next, clean the ends of the remaining hose with a cloth or towel. Then, using a knife or scissors, trim any rough edges from the ends of the hose.
Now it’s time to attach the coupling. For this step, you’ll need to consult the instructions that come with your particular coupling. But in general, you’ll need to align the coupling with the ends of the hose and then secure it in place with screws or bolts. Once the coupling is in place, your garden hose should be as good as new.
Of course, this method is only suitable for more severe damage. Sometimes the damage may be too severe or too close to the end of the hose to use a coupling. In such cases, it’s best to replace the entire hose.
But in case your coupling leaks, you can always replace it with a new one. Just be sure to follow the instructions that come with your particular coupling, and you should be able to get the job done without any problems. [1] [2] [3] [4] [5]
How to Prevent Hose Damage
As you can see, there are various ways to repair garden hoses. But the best way to deal with a damaged hose is to prevent the damage from happening in the first place. Here are some tips on how to do just that.
Store it properly
One of the main reasons garden hoses become damaged is that they’re not stored properly. In particular, leaving a hose out in the sun can cause it to crack and become brittle.
It’s also important to make sure the hose is completely dry before storing it. Otherwise, it could develop mold or mildew which will shorten its lifespan considerably. So, after using the hose, be sure to disconnect it from the faucet and allow any water remaining in the hose to drain out. Once it’s dry, coil it up loosely and store it away.
Inspect it regularly
Another way to prevent garden hose damage is to inspect it regularly for any signs of wear and tear. This is especially important if you live in an area with extreme weather conditions like excessive heat or cold.
Take a look at the hose before each use to make sure there are no cracks or leaks. If you spot any damage, repair it immediately with one of the methods described above. It’s also a good idea to replace old hoses every few years, even if they don’t seem damaged.
Avoid exposing it to extreme temperatures
Garden hoses are made of rubber. And like all rubber products, they can be damaged by exposure to extreme temperatures – both hot and cold.
If you live in an area with a hot climate, make sure to store your hose in a cool, shaded place when it’s not in use. And during the hottest days of summer, don’t leave it out in the sun for extended periods of time.
In winter, avoid leaving your hose outdoors if possible. If you must leave it outside, make sure it’s drained of water and stored in a protected location, such as a garage or shed.
Drain remaining water after watering sessions
If you have an automatic shut-off nozzle, this will be easier. But if you don’t, make sure to manually turn off the water at the spigot after each watering session. Once the water is off, go back to your hose and give it a few whacks against the ground to remove as much water as possible from inside the hose. This will help prevent any leftover water from freezing and expanding inside the hose, which can cause major damage.
Don’t drag the hose by the spray nozzle
The garden hose is made of different materials. The most common are rubber, vinyl, and polyurethane. And while all these materials are tough, they can be damaged if you drag the hose by the spray nozzle.
Don’t let your hose kink
Another cause of garden hose damage is kinking. A kink in the hose can cause the water pressure to build up. When a hose kinks, it puts stress on the material, which can cause it to crack and leak. To avoid this, make sure that you don’t let your hose kink. If you see that it’s starting to kink, straighten it out right away.
One thing that you can do to prevent your hose from kinking is to use a hose guide. A hose guide is a device that goes around the hose and prevents it from kinking. You can usually find them at your local hardware store.
And avoid storing it in a place where it will be bent sharply, such as in a corner of the garage. This can weaken the hose and make it more likely to kink. [6]
FAQ
How does a hose mender work?
A hose mender is a quick and easy way to repair a garden hose. Simply cut off the damaged end of the hose, then insert the mender into the end of the hose. The mender has a barbed end that will hold it in place. You can then screw the mender onto the hose nozzle or faucet.
How do I fix a hole in my garden hose?
If you have a hole in your garden hose, the best thing to do is to patch it up with a repair kit. You can find these at most hardware stores. Simply follow the instructions that come with the kit and you should have your hose good as new in no time.
How do you repair a rubber garden hose?
If your rubber garden hose has sprung a leak, you can easily repair it with a few simple steps. First, locate the leak and then clean the area around it. Next, apply some rubber cement or to the area and allow it to dry. Finally, wrap the area with a patch of rubber or hose tape.
Can you fix a garden hose with duct tape?
If your garden hose has a small hole or puncture, you may be able to temporarily repair it with duct tape. To do this, clean the area around the hole with soapy water and then dry it off. Then, wrap the duct tape around the hose over the hole. Be sure to overlap the edges of the duct tape by at least an inch. Press the duct tape firmly in place and then try using the hose to see if the leak has been stopped. If not, try wrapping another layer of duct tape over the first layer.
It’s important to note that duct tape is not a permanent fix and that your hose will eventually need to be replaced. However, using duct tape can help you get by in a pinch and may be all you need if you only use your hose occasionally.
Can you fix a broken garden hose?
It is possible to fix a garden hose that has been punctured or cut, but it will require some patching. You can purchase a repair kit that includes a patch and adhesive from a hardware store. Once you have the supplies, clean the area around the hole with soapy water and dry it completely. Then, cut a piece of the patch material slightly larger than the hole and attach it with the adhesive. If the hose is kinked, you may be able to straighten it out with pliers.
Useful Video: How to REPAIR GARDEN HOSE in SECONDS – 3 EASY WAYS!
Conclusion
Garden hoses are versatile tools that can be used for everything from watering the garden to washing the car. But like any other tool, they can break down and need to be repaired from time to time.
Luckily, with a little bit of know-how, repairing a garden hose is a relatively simple task that almost anyone can do. We covered the most common solutions to common problems, so you should now be equipped to fix just about anything that might go wrong with your hose.
But we’ll leave you with one last piece of advice: preventative maintenance is the best way to avoid having to repair your garden hose in the first place. Be sure to inspect it regularly for wear and tear, and replace it every few years to avoid any major issues down the line.
With this guide, we hope we’ve provided you with all the information you need to get your garden hose back up and running in no time. If you have any other questions about how to repair a garden hose or if you want to share some of your own tips, feel free to leave us a comment below. Happy gardening!
References:
- https://www.bobvila.com/articles/repairing-a-garden-hose/
- https://www.wikihow.com/Fix-a-Garden-Hose
- https://gilmour.com/garden-hose-repair-how-to
- https://todayshomeowner.com/how-to-repair-a-broken-garden-hose/
- https://www.instructables.com/Garden-Hose-Repair/
- https://www.gardeningknowhow.com/garden-how-to/tools/garden-hose-maintenance.htm